Tuesday, December 11, 2012

My Mind's Eye Christmas Design Inspirations

Hi everyone! I hope you are all well and starting to get into the festive spirit as well as crafting spirit. After all, this is the season of joy, peace, hope and love. Time when all is bright, like the Christmas projects that I’m delighted to share using My Mind’s Eye All is Bright paper collection. I created a couple of cards and Christmas gift baskets. 

My first card is a Christmas Box Card.

 JOY

 I learned how make the basic foundation of this card from a craft fair that I have attended recently. It was a portrait or vertical style of card that was taught. I'm just excited to make my own version in landscape or horizontal style. So happy with the paper collection and how the card turned out.More excited to share it with you.


 This is the side view of the card. I have decorated the spine with ruffled lace which I have misted with Bronze Tattered Angels  Glimmer mist and a strip of red velvet ribbon. Embellished the front side with cut out design and sentiment from the same paper collection.


 I had as much fun decorating the box inside the card and this is how it looks inside. The beauty of this card does not only shows from outside but also from inside. For those who do not celebrate Christmas, the theme of this card can easily be changed for any occasions. 

My second card is quite simple, quick and easy to make. 

Merry Christmas

Created a tent-fold style card. After layering the front with cardstock, pattern papers, trims and die cut swirls, I used layered stickers dimensional from the same MME All is Bright collection. Finished it off with some adhesive pearls at the corners.  


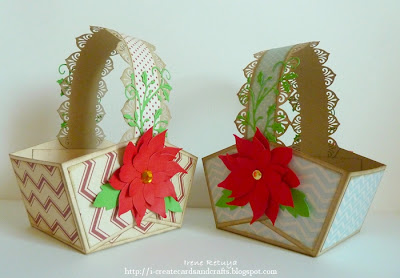
 The last project I made are the Christmas Gift Baskets and this how the baskets look like.
 

 The basket have enough space to hold your gifts...either sweets & treats, crafting goodies or anything you have in mind. It can also be use to decorate your tables and just fill it up with holiday cheers! The basket theme can  also be easily changed for any occasions.


Here is a tutorial for the Christmas gift basket.

Supplies: Cardstock, Pattern Papers, Trimmer/scissors,border punch, adhesives, embellishments of your choice; Optional: Distress ink, manual die-cutting machine & dies.
 
 1. Cut cardstock to 8 ½ inches square and score at 2 ½ inches on all sides. Cut as indicated using the template below as guide.


2. Using pattern paper of your choice cut panels and adhere the panels to the basket shape as shown. My panels measures as follows: 2 ¼ inches square for corner panels, 2 ¼ x 3 ¼ inches for center-side panels and 3 ¼ x 3 ¼ inches for the center panel or bottom of the basket. Distress score/cut lines and edges as desired.

 
 3. Assemble the basket. (Opps..I took the photo before I have attached the pattern papers)


4. Cut a strip of cardstock to 2 ½ x 11 inches and punch both edges. Top with a strip of 1 x 11 inches pattern paper and adhere to the basket to act as a handle.

5. Decorate basket as desired.


I hope I have inspired you all today.
Drop by at Paper Lane...grab the All is Bright paper collection from My Mind's Eye. You'll also be amazed by all the goodies available in the store. Also check out the design inspirations from my fellow DT.
Wish you all a Merry and Bright Christmas. 
Until next time, happy crafting!

Cheers,
Irene


Thursday, November 22, 2012

Design Inspiration - [Echo Park] For the Record 2


Hello everyone! 
For the record, I’m back with another project to inspire you.

[Echo Park
FOR THE RECORD 2 Collection 

 this beautiful paper collection is so inspiring.
 simply irresistible…simply fabulous...

Reminds me of some cherish photos 
that is just perfect for this paper collection…love it!
Hmmm…
I also have a thing with circles these days 
so I decided to make my layout a circle scallop. 

 
Simply ME

Hand cut a blue cardstock into circle scallop. 
And who says corner dies are only meant for square corners? 

 
In this layout, I used Cheerylynn Design Lace Corner Deco F die 
and the yellow pattern paper from the same collection 
as border around my circle scallop layout to give it a unique look.


 Used double sided foam adhesive t
o add dimension on the center circle in the layout.


Mat the photo with a dark blue pattern paper from the collection. 


The flowers were made using Sizzix Tattered Floral die. I simply love making them…
Die-cut some leaves and flourishes,
then arrange/glued them at the bottom of the photo 
above a border punch strip of pattern papers. 
Added pearls here and there…
place a title on a tag and the rest of bits & pieces. 
Simply fabulous...my page is done.

Product/technique tip: 
Look at your dies and try to use it in a different way just like I did 
and match it with Echo Park Papers ‘For the Record 2’.
It surely will add some stylish flair and interest to your page. 
Experiment and enjoy!

Supplies:
Paper: 
 Echo Park - For the Record 2
Cardstock: 
 Bazzill - Blue;
Embellishments: 
 Kaisercraft - adhesive pearls and pearl brads; 
American Crafts - mini pearl brad; 
October Afternoon - mini market stickers
Tools: 
CheeryLynn Design - Lace Corner Deco F/Olive branches/Fanciful Flourish; 
Sizzix – Sizzlits Strip Vintage Market/ Bigz Dies Tattered Florals; 
Martha Stewart – arch lattice punch


And yet another inspiration for you…
This is one of MY FAVORITE


TIME WITH dear friends, family, loved ones and of course YOU.

 
Kept this card fairly Clean And Simple. 
You will be able to make one in no time.


I covered the card base with paper from the collection 
then added ribbon, trims, Prima flower and leaves. 
Added my favorite sentiment which is also from For the Record 2 Journaling Card.


Hope I got you inspired. 
Just for the record…
time for you to scrap those photos and cherish precious memories 
or made a card for your dear friends, family and  loved ones. 

Don’t forget to grab the Echo Park ‘For the Record 2’ collections at Paper Lane store.
 Join and like Paper Lane at Facebook and 
check out the latest design inspirations from my fellow DT members.

Happy crafting everyone.


Hugs,
irene
 

Sunday, October 21, 2012

I {heart} Washi

Hello crafters! 

It’s time to un-roll those washi tapes. 
If you don’t have one, 
time to drop by at Paper Lane 
and grab one for yourself.  

Here are some inspirations for you from the 
Indie Chic collections…

Love this collection, it really has chic designs. 

 Chic tag

Recycled the packaging and made a tag. 
I used washi tape as a background and made a flower out of it.

Also used washi tape as decorative border in a tag. 
Goes well in layouts or cards too.

I decorated/altered an empty bottle.

  
I called this my ‘Washi-tainer’

Washi + paper clips = Clip-tastic!
My colleagues love this!!
 
 Decorated some binder clips!
Made some tiny banners  on pins!  
Then use as embellishment on a project.
Decorated some tea candle holder

I {heart} Washi…chic
so versatile…possibilities are endless…
easy to take anywhere.
 

I hope I have inspired you today.
I wonder what you’ll come up with.

Visit Paper Lane's beautiful store and grab some washi tapes.
Do check out Paper Lane's Blog 
and projects from my fellow DT members.
Like Paper Lane at Facebook too!

Most important is for you to enjoy and have fun!


Cheers,
irene 


Monday, October 1, 2012

Art Reigns Supreme at Paper Lane !!!

This is going to be an exciting month...

Paper Lane introduced
the newest, freshest and most exciting

"THE ARTIST IN YOU" 
 
series of new creative workshops.
Classes to be offered at Paper Lane starting this October.
 
Coupled with the newest and latest range of artist and mixed media supplies 
that are finally at Paper Lane's shelves for the first time.
October  promises to be one hot and exciting month to look forward to!!!


For more workshop details check out Paper Lane's Blog here.
or simply give them a call at 04-3443633 for any inquiries! 

What are you waiting for?
Unlock the artist in you...

Hugs,
irene


Sunday, September 30, 2012

An Inspiring Story


 Tell Your Story Collection
{Teresa Collins}

We all have a story to tell and it’s wonderful to show them through our creations.
Either a card… a layout…a mini album…
or any projects you have in mind
Tell Your Story Collection
Is perfect for that!

Let me tell my story…
Hmmm…show you what I came up with
Such an awesome double sided paper collection

Made a card with you in mind


Did a bit of punching, embossing, die cut leaves…
added some ribbons and a rhinestone medallion from the same collection...

 Love the way this card turns out.

Just For You

Can’t help myself… love the papers and love the colors.
Awesome! So, I made another card…

 
The collection comes with lovely flowers and chevron designs too,
just right for my card.
Die cut some leaves and a bird which I painted with silver acrylic paint
then embossed with silver embossing powder…
little bit of texture, rub ons sentiment, stickles and  rhinestones.

Decorated inside the card too!


 Cherish

 We CHERISH every time you visit Paper Lane!
We CHERISH your moments with us and it simply takes our breath away!

 Tell Your Story
I still have a SPINning story to tell…
With this collection, you will never be run out of inspiration.
I love quotes and if you do, it is right there in this collection too.

Another project I came up is a Mini Spinner Album
Perfect for all my stories to document and share


Because it spins, the story never ends…
when one story ends, a new story begins…

view of the spinner from the top…

Here are the pages…


 Had an awesome and wonderful spinning moments creating this up
Time to spin your creativity and
remember to follow your heart…

It’s  also time to drop by at Paper Lane and grab your collections.
Do check out the latest stories at PaperLane Blog,
and projects from my fellow DT members.
Like Paper Lane at Facebook.

Be inspired…create…tell your story.
 Would love to hear from you.

Hugs,
irene


Monday, September 17, 2012

Sympathy Card

Hi everyone!
Days gone by so fast, isn't it?! 
Or was I simply busy and occupied? 
Yes, I was busy with work and a little bit of something...
 hmm...will be sharing those "bits of something" with you soon.

Meantime, sharing today a quite simple card...

 Sympathy Card 


Remember, no matter how simple a card is
it's the thought the counts the most.


Have a wonderful day!

Hugs,
irene

Sunday, September 9, 2012

Lovely NEW Paper Collections and more at Paper Lane

Hi everyone! 

Exciting news!!!!
Paper Lane has lots of beautiful and awesome
NEW 
paper collections and embellishments, 
Cheery Lyn dies, 
Faber Castell gelatos, 
PanPastel, 
Golden mediums and finishes, 
stencils and 
restock of all your favorite products. 
Do check it out here
It will be more fun and exciting to head over 
to their beautiful store and grab your goodies...
time to reload your stash. 
I just did!!!

More are coming up...
so stay tuned and make sure 
to follow Paper Lane by email  for updates 
and Like at Facebook too. 
Shop online here.

 Have fun everyone!

Hugs,
irene


Monday, September 3, 2012

I am Blessed - Proud to design for Paper Lane

Hello everyone! Hope you are having an awesome day!

Me? Had long and exhausting day from work and reach home soooo late...hungry...tired...

But then life brings on a balance and gave something wonderful and good in return...and I AM BLESSED!

Sharing with you an awesome and fantastic news today!!! Yes, I made it as a design team member.


I’m deeply honored and humbled to be a member of Paper Lane’s amazing and talented Design Team. I look forward for fun, creative and learning filled journey/experiences in the coming days, weeks and year ahead. I hope to contribute, inspire and motivate others with my creations. Also, to showcase the projects I create using the supplies that are available at Paper Lane. If you are or happen to be in Dubai, don't forget to drop by and visit their beautiful store located at Town Center Jumeirah. Paper Lane is the best scrapbooking store in UAE and Middle East. Visit their blog here, their store website here and like them at Facebook here.

Have a look at my latest creations for Paper Lane:

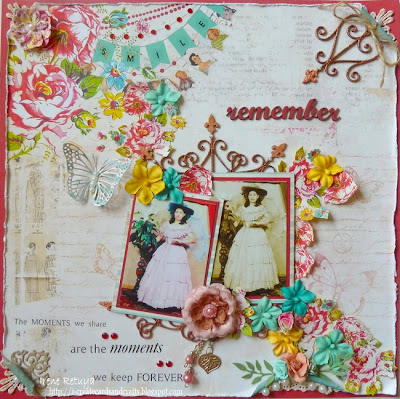
 Remember

I used the New CHA Summer release by Glitz Design Cashmere Dame paper collections. Beautiful paper collection to play with it's yummy goodness. Brings back a lot of wonderful memories old and new alike...remember...it's time to scrap those photos of yours. I just did! 

 Distressed the pattern paper and attached it to a red card stock. Added pearls and trims behind. 
 

I stamped the page with Hero Arts Antique Background and brush it with Perfect Gold and Pink Gumball perfect pearls. This is a technique that I learned after attending Iris Babao Uy workshop during Paper Lane’s 6th Birthday Celebration last June 2012. Painted a dusty attic wrought iron design with Adirondack metallic copper acrylic paint and embossed it again with copper...lovely effect, isn't it? Cut it in half and stuck between the photos.
 

Painted and embossed another one placed it the corner in which I rolled the paper and tied with a jute cord by Canvas Corp. Painted red the title which is also from DA mini word. 
 

Embellished the page with Prima flowers and a butterfly using Cheery Lyn dies.


My page is done. What a lovely splash of color, isn't it? Brings happiness and joy!

And yet here's another layout from the same paper collection...
Peaceful Heart

Here, I have masked and misted a white cardstock. This paper collection is totally awesome with the chevron, hexagon, strips and dots design...what a good idea to do...put them all in one layout! Yay!


Use the same paint and emboss technique on the title. Added my photo in a painted/embossed ATC DA frame...some prima flowers here and there, die cut leaves and a butterfly using Cheery Lynn die, wooden Prima buttons and Kaisercraft rhinestones. 

my page is done...
                      my heart at peace...
                                                    and I find beauty in all things...

All supplies and dies for these layout are available at Paper Lane. Why wait? Head over now to their store and find all beautiful things...time to pamper yourself!!!
 This is a scrapping goal comes true for me and an experience of a lifetime. I am very thankful for the opportunity.

Hugs,
irene